I did come across a few sites that provide such information. However, since I don't really know my way around the Photoshop, I found myself a bit lost. I had difficulties following exactly what the steps told me to do cos I couldn't find some tools/buttons mentioned. Furthermore, all the instructions were in text form.
Then, I gave it another try today. And suddenly, I found the tool which was mentioned in the instructions... Finally, I am able to add a perfect digital watermark to my photos :)
I am so excited and I wish to share what I've learned. So, I've decided to write a simple step-by-step tutorial (with screen shots) on my way of adding digital watermark to my photos. I hope this will help those of you who are searching for tips on this matter.
First of all, open the photo file (that you wish to edit) with Adobe Photoshop Elements 5.0
First of all, open the photo file (that you wish to edit) with Adobe Photoshop Elements 5.0
(Note: Please click on the following pictures for a larger view)

Step 1: Select the Horizontal Type Tool

Step 2: Type the text you wish to indicate as your digital watermark

Step 3: Highlight the text and change the font colour to 50% Gray

This is how it'll look like after Step 3

Step 4: Under the Artwork and Effects palette,
click on the Special Effects button
click on the Special Effects button

Step 5: Under the Layer Styles (Bevels) menu,
select Simple Emboss and click Apply
select Simple Emboss and click Apply

This is how it'll look like after Step 5

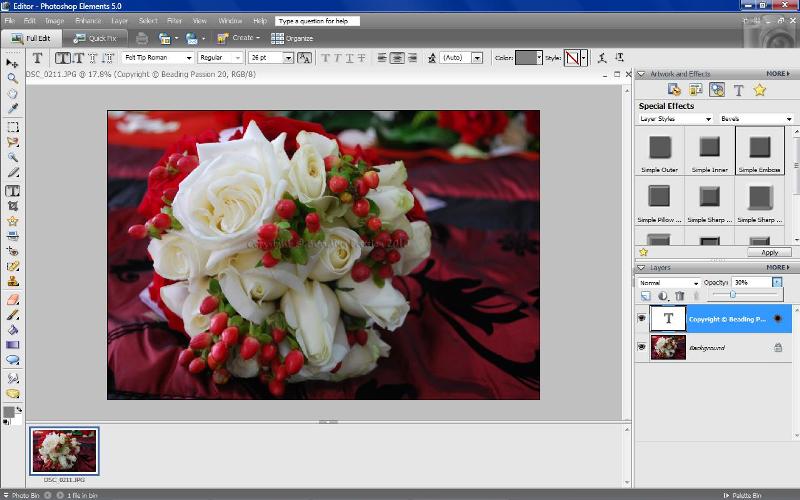


Photo with a digital watermark
Well, I hope you find this post useful...
If you have any inquiries, please feel free to e-mail me at
katrinagumal@yahoo.com. I will try my best to help ;)
cantiknya bunga aku...hihihi...aku pun nak kena belajar la edit gambar ni...nak kena install photoshop dulu...apa2 pun pas pindah nnt
ReplyDeleteTQ Kat for the tutorial....by the way, I haven't visit your blog for so long and when I take a look at it today..wow your wire jewelry pieces are so beautiful..it look so hard to make...keep up the good work!!
ReplyDeleteYou're welcome, Zai... And thank you for the compliment :)
ReplyDelete